Wednesday, December 21, 2011

Merry Christmas to All

Bill and I wish all are family and friends a very wonderful Christmas and the best in the coming new year.  We have been so fortunate to have all of you in our lives. 
May the coming new year bring you wonderful surprises, connections with family and friends, and the best that life can offer.


Roseburg has a great little art gallery filled with our local artists' talent.  The two Santa's were found there this week.  The artist who carved them is Jani Brown.  Each piece has a special meaning to me.  The large thread spindle because my Polish Grandmother (Babci) use to work in the thread mill in Norwich, Conn.  That was how she supported a family of six children.

The smaller wooden spool because I sew and this is one of the few wooden spools I have seen.  I thought it was a fantastic fine until I researched it.  The J&P Coats Company and the Clark Thread Company merged in 1959.  This makes me older than the wooden spool.  Isn't that a sorry thought!

If you are really interested in some of the history of thread then you might enjoy the following:

History of Coats & Clark
With a rich heritage dating back to the early 1800's, Coats history is interwoven with many key innovations and historic events dating back to the beginnings of the industrial revolution. With nearly 200 years of history to share, we have selected a few interesting facts and images from our archives that we thought you would enjoy.
  J & P Coats   


interesting facts
 

1806 — Napoleon blockaded Great Britain, making silk no longer available to weavers who had begun reproducing the rare Kashmir shawls of India. At the time, the Clark family had a thriving loom equipment business, and sold silk threads for the warp on the looms.

It was at this time that Patrick Clark developed a method of twisting cotton yarns together to produce a thread which was so strong and smooth that it could replace silk in the looms, as well as replace linen and silk threads used for hand sewing as well.

1812 — The Clarks opened the first factory for making cotton sewing thread in Paisley, Scotland. A few years later, another cotton thread mill was opened by James Coats.

1830 — The sons, James and Peter Coats, purchased their fathers' mill, and within a decade, J&P Coats Limited had expanded, with much of its production exported to America. Another member of the family, Andrew Coats, was sent to the U.S. to manage the business.

1864 — George and William Clark, grandsons of James Clark, opened a cotton thread mill in Newark, New Jersey. Five years later, the Coats family began manufacturing thread in Pawtucket, Rhode Island, selling under the name "Spool Cotton Company".

Before Elias Howe's invention of the sewing machine in 1846, thread was usually made of three cords and was used for hand sewing. The thread had a glazed finish and was too wiry and uneven for machine use.

Twenty years later, George Clark developed a six-cord, soft finished thread. This thread, the first ever suitable for machine use, revolutionized the sewing industry, and therefore he called it "Our New Thread." This became known as O.N.T., originating the still famous trademark for the Clark Thread Company product.

1896 — The company continued to grow by adding new products and innovations, including crochet, darning, knitting and embroidery cottons. O.N.T. was the first genuinely fast black thread and the first American brand of sewing, crochet and embroidery cotton to be offered in a large range of colors, all color fast to boiling.

1935 — Prior to 1935, Coats & Clark companies in the United States sold a wide range of cotton threads and handicraft products but no wool yarns. An agreement was reached with Patons & Baldwins, a British manufacturer of knitting yarns, to make yarn in the United States which would be marketed through the Spool Cotton Company.

1952 — J. & P. Coats and the Clark Thread Co. merged to become Coats & Clark Inc.

1959 — Two important innovations were developed, starting with our first 100% acrylic yarn in 1959, followed by the release of Super Saver 'no-dye-lot' yarn in 1987.

1960's — Coats & Clark created cotton-covered polyester core thread which combined the best characteristics of both fibers making it compatible with new fibers and fabrics which had entered the market. Today, Coats Dual Duty Plus® is the number one selling all purpose thread in the home sewing market.


Today, Coats world-wide continues to innovate. Through ongoing research and product development, we explore new fibers, fabrics, finishes and their application for consumer and industrial applications.

Merry Christmas and a Happy New Year !

Wednesday, December 7, 2011

Happy Holidays and the Goodwill Store

The Goodwill Stores are wonderful places to shop for those of us looking for an alternative to Macy's, Neman Marcus and other high price stores.  I do not intend to put them down as I use them for donations and also for jigsaw puzzles and other things. We are blessed that we do not have to depend on them.

Having said that, Rosemary (my sister) and I went shopping in Lacey at the Goodwill store for jigsaw puzzles while we were visiting Grandma this last weekend.  Every now and then in life you find yourself falling into the 'silly mode'. If anyone is offended by this blog, then you can blame me as I egged Rosemary on and then came back with Grandma and pulled her into the sillies also.

Could this also be one of those "Dear Santa" lists?

Hats, hats, and more hats.

  Back View

Front View
Doesn't Rosemary look totally thrilled to be here and posing with the hat that she picked out?  Hey Vern - Do you really think she would like one of these?
Back View
Front View
Gee, I'm glad Bill doesn't read my blogs or I just might find one of these under our tree on Christmas Day!
 
 Back View
Front View
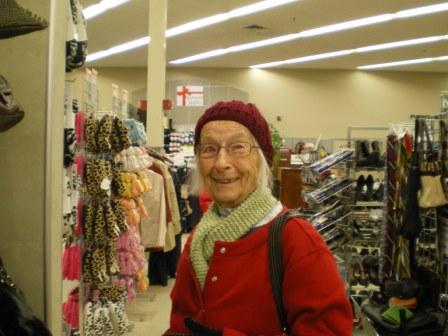
We all should recognize this fine lady and the knitted hat she is wearing.  All of us have one, two or more of her hand knitted hats (if you are lucky!).  She is quite the sport to come to Goodwill and do the 'sillies' also.
 
So much for hats.  All women love just the right handbag to carry all of their essentials in...  (Santa are you getting hints?)
 Could this be high on Rosemary's wish list?

 Or Sue's?
Or Mom's????

If you are actually reading this for hints of Christmas gifts, then continue on.  A woman's wardrobe is not complete without just the right pair of shoes.

Look what Rosemary found just waiting for her....
They might not make it through a Kennewick winter but think how snazzy they would be when summer comes.

You know, I could maybe get used to these!!!! Dear Santa, please put them on your list.

Rosemary and I did find some hidden gems - jigsaw puzzles and exercise DVD's.  If you are a jigsaw puzzle fan this is the place to find them.  Most of the puzzles have all the pieces.... some don't and are marked (or maybe not) but what deals and then after you finish the puzzle you can either donate it back to Goodwill or pass it along to a friend.  If you have a break room at work then bring one and see what happens.
 Mom and a Goodwill puzzle!

Happy Holidays from all of us :-)


Thursday, December 1, 2011

Oop's

I got so carried away squaring up and sewing the blocks together that I found I was almost through with the project without taking any of the follow-up pictures.  Let's hope that what I took will explain the ending process.

 The black and white material is 4 1/2 inches wide and folded in half.  It is cut the length of the block.  The black with brown stripes is cut at 2 1/2 inches and is the back joining piece.  Place on the finished squared block right sides facing each other. Sew.

  Sew back joiner to second block.  If you do this right then all of your pieces are to the left of the sewing needle.

Slide in batting which was cut at 1 inch.  Fold over the top joiner (black and white material) and stitch down.  Isn't this slick :-)

If this is still a bit confusing refer back to the link in the last blog.  The tutorial instructions and pictures are so much better than mine.

This is the back of the piece.  I like this side better...see lessons learned for the reason why I am not showing the front side!

Lessons learned:  1) Just because you use fabric in the same color or family set does not mean that your quilt will come out looking good.  Always remember to audition where your pieces are going and how they will look next to each other.  This is probably the major reason why the pros have a design wall or space dedicated to viewing their quilts before they are even brought close to the sewing machine. 2) Always stretch outside your comfort zone.  This is where learning begins.

If I had to do it over again I would have crazy quilted the front sideRandomly using the fabric strips did not work out.  The colors were too jumbled and close together to make sense.  

On the way home from town today I stopped by Chris' house (another quilter and recent retiree).  She has been working on a huge project (a kings size quilt for their bed).  What an awesome job she is doing with it.  Being a hunter and liking elk, she has featured an elk as the center piece.  Next time over I will see if she will let me take pictures.  It is so nice to have another quilter to draw enthusiasm and inspiration from.


Happy learning days!

Monday, November 28, 2011

Two for One

Let me first give credit where it is due.  I've found this most amazing quilt site with the most amazing tutorials.  The lady does the most amazing work.... I know, I keep using the work amazing!  Try this blog: http://www.thequiltingedge.com/   That said the following quilt idea came from her tutorial and making two quilts at the same time.  

First you start with 15" squares of batting.  Since this was only going to be a learning quilt, I only cut out four squares.  Tomorrow if Joannes still has the same packet of material I will get it and expand on the size of the quilt.  So here it goes with pictures.

The first piece goes face up, the second piece goes face down.  You have two right side materials facing each other.  Sew with a quarter inch seam, press open and continue until you whole square is filled.  You are making a log cabin pattern. 

DO NOT SQUARE UP YOUR BLOCK AT THIS TIME!

I won't bore you will the step by step for each quilt.


These are my four finished blocks.  I used other material from my stash and scraps.  Again, do not square up your blocks! Set these four squares aside.


The back of the quilt can be as much fun, if not more.  I went for a totally different color run.  The back squares are sewn independently and when finished are placed on the back.  This is when you do all of your top stitching.  I put on my walking foot and did straight stitching to hold all three pieces together.  You can get as fancy as you like for this stitching.


The backs.  Again, DO NOT square up your blocks until you are ready to join them.  The next step of joining the block is on hold for the moment but if you want to know how to do it see the blog link that I have attached.


Being I jump from project to project the following quilt top was made last year.  I am only now getting back to it since I have the time to finish it.  I still hesitate with the "big" machine sewing as I don't have the skill to do the pretty fancy top stitching and this sewing machine is so hard to get the tension just right.  I can spend as much time sewing with it as ripping out what has been sewn.
All set and ready to go!  Maybe today!!!


Happy Trying Something New Day!

Thursday, November 24, 2011

Thanksgiving Day

There are so many things to be thankful for today.  Family, friends, home, love, kindness, caring, and sharing dinner with friends today since family is so far away....

 I am very thankful that this morning gave me the time to finish the last pumpkin quilt.  This one looked like a sea urchin for most of the time it was worked on.  The material for the large pumpkin was changed from the first picture since the coloring strongly reminded me of the sea urchin even though, strangely enough, it match almost perfectly the pumpkin that was used for the model.  Go figure!


While at our local quilt store I was talking with Charlie, the owner, and after listening to my tale of woes on this quilt she sent me home with two spools of varigated thread to try. 

Needless to say the colors did not work.  It is almost impossible to hold a color in your head/mind and think that you can match it without material in hand.  So all the top stitching was ripped out.  (Note the TV remote!!!!)  So after a few programs of Home & Garden, it was back to the sewing table.

 The stem really helped with making it no longer look like a sea urchin!

And today the whole thing is completed and just waiting for another one of Bill's fancy quilt holders.


I promise 'no more food or fruit quilts' for a while.  But I have started a new quilt project....more about that later.

Happy Thanksgiving.

Sunday, November 20, 2011

Mushroom Maddness

These just popped up in the backyard.  Since they circle the tree can they be called a "Fairy's Circle"?

And we don't even know if they are safe to eat... so we will let nature keep them - every single one!


Happy Winter Days!
 

Friday, November 18, 2011

One More Done

It was finished yesterday but it took till late this afternoon before the little black straps were added to hang it with.

Bill made the display stand!  Isn't it wonderful!  He is so clever with what he can make out in the garage.  Show him a picture and he can make it.  


 The mini quilt is 8 1/2 by 8 1/2 inches.  Just in time for Thanksgiving!


Happy snowy winter days (we had the first snow fall today :-))
 

Tuesday, November 15, 2011

A Day in the Loft

Yesterday was one of those days.  We all have them.  The day flies by and you wonder what you have accomplished.

Most of the day was spent (happily and quietly) in the loft working on the pumpkins.  I can't believe how such a simple project can take so long to complete.  And it is not even close to being completed....

How long can it take to add the shadows....and settled on final positioning!  

This is the second white pumpkin and it is a little better than the first one. Sitting here looking at the picture I can see a solution to the white pumpkin!  It has been nagging at me for days now.

And the bananas are moving again....

 
All in all a good day.

Happy winter days!

Sunday, November 13, 2011

Who Can Pass Up a Bargain?

Or this could be called "You can never have too many projects going at the same time!"

I've had my eye on the bags of petite pumpkins ever since they came in season but: 1) didn't want a whole bag of them, and 2) was too cheap to spend the money.  So this last week when in town they had them in a bin at give away prices.  Now who can pass up a bargain. And no, I am not going to cook with them.  Being a quilter and not a cook you can well guess what happened to these happy little guys.


Aren't they cute :-)  The colors are so wonderful!  It was a sunny day so for the photo shoot I put down black material and just put the little guys on it.  The sun was coming through the slider and gave me all the shadows I wanted. From there the pictures were downloaded to Photo Elements and played with and printed out.  I'm still working small since I can only print on 8 1/2 X 11 sheets of paper.  But small is good. 


At first I didn't think I had the right colors.... until I started pulling out my stash.  This is so made for fall that it might actually get finished before the bananas!


The bananas have not been forgotten and there are now 50 French knots on the plate with probably another 1,000 to be added.  Its a great project for watching TV with.

Update on Bill Bryson's book "At Home".  It is not witty but it is filled with trivia that is fascinating.  It is not a 'can't  put down page turner' but every page is filled with something interesting.

Happy Fall Days!

Friday, November 11, 2011

Banana 2

The bananas have not been forgotten.  Every day they have been looked at, thought about, and then set aside.  The question, "Where to go from here?" never had a satisfactory answer.  It wasn't till I popped in the DVD on thread painting (remember that from the pears) did a make or break possibility arise.


Having vast resources at my finger tips does help - okay, I am a compulsive quilt shopper when it comes to books, fabric, thread, DVDs and anything connected to the hobby. The bookshelf, attic, and wardrobe are over-flowing!


This does not make me an expert especially when it comes to thread painting.  But the bananas are another learning step so whatever happens to them is good, (not beautiful but good).  So that said, here is what happened to them today.


I am thinking of doing French Knots around the outside of the plate and then using fabric paint for light and dark shadows....this could be interesting.

Book recommendation:  While at Costco I spotted Bill Bryson's new book "At Home".  Years ago I read his book "A Walk in the Woods" and thought it was one of the most witty books I had read.  Well, he is back.  While sitting in the car waiting for Bill as he did a quick (no such thing) trip into Lowes, I picked up the book and began reading.

This is not my thought but Bill Bryson's and from the introduction to his new book:  

"Sitting at the kitchen table one afternoon, playing idly with the salt and pepper shakers, it occurred to me that I had absolutely no idea why, out of all the spices in the world, we have such an abiding attachment to those two.  Why not pepper and cardamom say, or salt and cinnamon? And why do forks have four tines and not three or five?..."

...and so I am lured into wanting to read more.
 
What better time of year to curl up with a good book, a glass of wine, and a comfortable chair in front of the fireplace.

Happy winter days!

Thursday, November 3, 2011

On a Fruit Roll !

It was either fishing or bananas.  Bananas won out.

The pear quilt was a breeze compared to the struggle with bananas.  If nothing else, it is another learning curve - both in quilting and photography.  You're asking, 'just how hard is it to take a picture of a bunch of bananas?'  Not very, except when you want to make it into a fruit quilt/pattern.


For some reason this blog picture looks a lot better then the one I was working from.  There is a bit more contrast.  But that said, the lesson learned is to set up the picture with a strong direction of light to give heavier one way shadows. 


I use a light box for making the drawings for the templates.  How easy does this look! Notice there are no shadows drawn for templates.  Oop's!


First thought was to use contrasting colors.  The plate was going to be purple but as you can see it is red.  That is proving to be a bad decision.  I am now wishing I had stay with the white as in the picture and used a black background.  But the fusible applique is already ironed into place. So we will play with what we have.


Thank goodness for a bit of watercolors. By the time I had to seriously think of those darn shadows all the pieces were fused in place.  For the shadow between the bottom banana and the next one is done with fabric and a yellow/brown mixture of watercolor paint.

And this is as far as this one has gone.  

I've finally had the time to set up my short-long arm quilting machine and get the Christmas quilts on them.  Good days and bad days with that piece of equipment but I think I finally have the hang of it.  After hours of pulling tangled thread from underneath the quilts, taking out the bobbin and everything around it to clear out that mess of threads, breaking thread, setting tension.... the last quilt is on the machine.

I'll post the Christmas quilts after Christmas as they are secret gifts!

Also for the month of November I am on call for jury duty and have to call in every night.  So far my number has not been called.   And then three days a week I am doing Zumba.  And then there are the books I can't keep my nose out of and also the morning hours spent on the computer looking at other people's quilt blogs.  No wonder the poor bananas are still hanging on the design wall.....

Happy quilting!

Thursday, October 20, 2011

Ta Da!!!!!

It is finished !!!!


...and yes, there is another one on the drawing board.

Happy Day !

Wednesday, October 19, 2011

Thread Painting

To call it thread painting is to use the theory very loosely.  I still haven't master the art of free hand machine quilting so I go back to what I am comfortable with.  Good old straight stitching with lots of curves!  


90% is done with straight stitching but the stems and the small shadow between the pears are free handed.


Moving right along with the stitching.  I have three layers that are being sewed through: top, batting, and stabilizer.  I would have put a backing on this but I am thinking of going with an envelope back because I have never did a backing this way.  


I still wanted to add some red to the pear on the left.  Even though it is hard to see in the picture there is just enough to balance with the dark green.  And it made me happy :-)  You can see in this photo some of the shadow stitching.


Now this could open up a whole new quilt project.  I've seen it done in large quilts where the design is totally stitched using colored thread.  But for now we will flip it over and finish it tomorrow.


Happy quilting!


Tuesday, October 18, 2011

Audition Time !

It only took one time to remember that patterns have to be cut in a reverse image if you want them to match your picture and the same holds true with cutting out your fusible appliques.

I've found using a light box helps but if you do not have a light box then a window works the same.  

Now comes the fun part (and also the frustrating part).  Finding just the right fabric to use. I did want to match the rosie red of the pear on the left but I didn't have quite the right material so after many trips to the red bin, I decided to then go with a darker green.  

 Not liking the pink/red at all.


Not exactly thrilled with the dark green either.

But this is only going to be a sample, test art quilt so we will see if adding stitching and embellishments helps.


At least they still look like a pair of pears!

Being lost in the excitement of doing this project I jumped ahead a step.  I find it easier to do the free hand stitching on the top layer before ironing down the fusible pieces.  OOP's. 

Back to the quilt books....I know there are a few of them on the shelf with "How to free hand machine quiltinformation.

Hey Keith - loved your pink birthday cake!!!  Is this going to be a new fad for the men in the Davidson family??

 
Happy birthday to Keith.... and happy stitching to others.